![]()
EARLIER FEATURES
![]()
FEATURES CONTENTS
![]()
LATER FEATURES

|
|
|
|
| 27th August 2012 | USING WINDOWS 7 - |
Brian Grainger
|
|
Last time we covered things to do before you actually USE Windows 7 to do some work. This time I am going to start looking at how to use Windows 7, with emphasis on the differences from Windows XP. Whereas the general user seems to find Windows 7 an improvement, the power user may miss some functionality of Windows XP. Throughout this series I will discuss how to recover Windows XP functionality should it be necessary and possible. When you boot up there is not much significant difference in the look of Windows 7 from all versions of Windows since Windows 95. What you see is a desktop adorned with some wallpaper, (now called 'desktop background'); a few icons on the desktop; a button at the bottom left of the screen; a bar along the bottom of the screen with various buttons and icons along it (the Superbar). Although it looks similar to the Taskbar of previous versions of Windows, the Superbar behaves significantly different and warrants an article (or more) of its own. In this article I am going to briefly discuss the desktop and then concentrate on the button at the bottom left of the screen. In truth the desktop and button of Windows 7 is nearly identical in implementation to that in Windows XP. However it appears different in operation because of the following:
The desktop itself is pretty much as it has always been. It contains icons that are shortcuts to applications, documents, etc. The only difference in appearance is that there are fewer icons on the desktop before you add any of your own programs. The Recycle Bin is still there to recover documents inadvertently deleted. Apart from that there are a few shortcuts to preinstalled programs such as Internet Explorer and Windows Media Player. Usage of shortcuts on the desktop to start applications, while still allowed, is deprecated in favour of the alternatives. Of course, lack of icons means lack of associated context menus (right click) and, therefore, lack of quick access to some utilities for Power Users - such as Device Manager from the context menu of 'My computer' on Windows XP. One thing to mention about the desktop is, for Power Users, its location in the file system. It is in the Desktop folder of the logged in user's profile folder within C:\Users. Finally, we must not forget the context menu for the desktop. Right click in a vacant space on the desktop to bring up a menu of options to personalise desktop and screen views. In Windows XP this was accessed via 'Properties' on the context menu. With Windows 7 this is renamed to 'Personalize'. Windows 7 has a new item on the context menu, Gadgets. Called Widgets in another OS, these are mini apps that can display information on the desktop. They default to the right hand side of the desktop but can be dragged elsewhere. Windows 7 comes with a few Gadgets such as an analogue clock and a calendar. Apart from the inbuilt Gadgets more are available online. It is worth noting that you can have more than one instance of the same gadget displayed. This allows, for example, the display of multiple clocks set to different time zones. Right click a gadget to personalise it. It is now time to address the button at the bottom left of the screen. Formally called the Start button, it no longer has the word 'Start' on it. Have Microsoft succumbed to remove the old joke - How do you stop Windows? Press the Start Button! More likely it is to minimise the space used along the bottom of the screen. The tooltip that appears when you hover over the button still says Start. On Windows XP it was 'Click her to begin'. On other web sites the term 'Orb' seems to be coming to prominence to describe this button, so I will follow suit. I will still talk of the Start Menu because the Windows 7 help still refers to it this way.
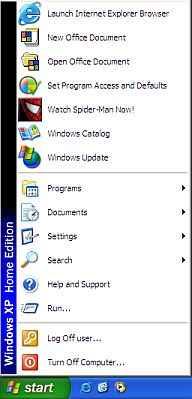
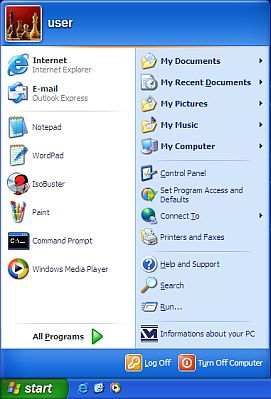
In Windows XP the display when pressing the Start button takes one of two appearances, dependent on whether you are in 'Classic' view or not. In Classic view, which I favour, it reverts to a single pane Windows 9X appearance. In normal view there is a two pane display. Everything to do with programs on the left side. On the right side is everything else, documents, settings, etc.
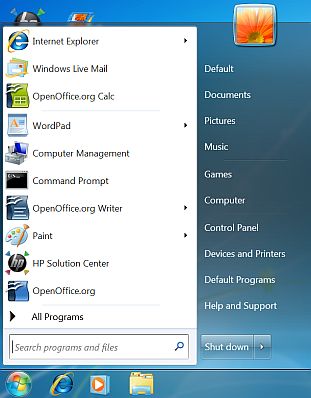
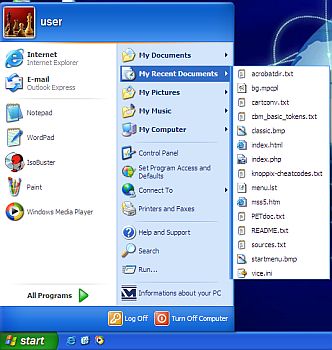
The display when the Orb of Windows 7 is pressed is very much like the normal view of Windows XP. There is no option for a Classic view. If you are desperate for the Classic view then I recommend you consider an open source add-on, 'Classic Shell', which includes a Classic View button as well as other features you might find handy. The display when the Orb of Windows 7 is pressed is in two panes. The left pane primarily concerns itself with starting application programs (or documents of application programs). The right pane concerns itself with opening folders or Libraries and changing settings. At the top of the right pane you will see the icon and name of the currently logged in user, (My user name is 'Default' in the picture above) . Note that, unlike Windows XP, the icon pops up above the top line of the menu. If you have a habit of using multiple user accounts the icon and name can give you a clue as to who you are at the time! Left clicking your user name will open Windows Explorer at your profile, something I had problems with when I was writing the earlier article in this series! Next in the right pane comes Documents, Pictures and Music. Left clicking these will open up the associated Library in Windows Explorer. For some strange reason the fourth default Library, Videos, does not appear in the right pane. However, you can customise the Start Menu, (see below), to make it appear. The concept of a Library is new to Windows 7. Essentially, it POINTS to items in a collection of one or more folders. The files that are seen in a library are not actually stored in the library but in one of the folders the library points to. Right clicking a Library and choosing Properties will show the folders at which the library points. You can also add new folders to your library in this way. When I first came to Windows 7 I was unsure about Libraries. They appeared to be another unwanted complication, especially when they appear in Windows Explorer like other folders. With a little thought I can see their usefulness. I have always been irritated that Windows XP put My Documents, My Pictures, etc. in the same partition as the Windows Operating System (OS). I prefer to have my data quite separate from the OS to make it easier to back up. Consequently My Documents and the like were completely useless for me and it made it more difficult to encourage others to store data separate from the OS. With the concept of Libraries we can choose which folder to store our data in and add it the Documents Library so that we still get full visibility via the Start Menu. Microsoft may choose to include a Documents folder within the OS but we do not have to use it any more to get full visibility. Next in the right pane of the Start Menu comes Games. Left click this and a selection of games appears. The offline games are stored in subfolders of c:\Program Files\Microsoft Games. The 'Games Explorer Folder' that you are viewing provides more than this. It can advise of updates to games and it also includes icons to access online games. At the time of writing I am not sure how this Games Explorer Folder is created but from looking at the web I think it may be created from entries in the Registry rather than folders on the drive. This is, no doubt, a new feature of Windows 7 for the benefit of gamers. I suspect I will get more interested when I want to add the Sudoko Solver tool to Windows 7! After Games in the right pane of the Start menu comes Computer. This is a bit like the My Computer desktop icon of Windows XP. Left click and Windows Explorer opens at the Computer level showing all hard drive partitions and other connected drives. Right Click Computer and choose Manage to see the Computer Management tool. From here you can get to Device Manager and Disk Manager as well as a few other tools that System Admins will find handy! Right Click Computer and choose Properties to see some basic information about your system configuration as well as getting access to tools that users might find useful - such as Remote settings and System protection. It is also worth mentioning that from the right click context menu of Computer one can select Show on Desktop. In this way you have the equivalent of the Windows XP 'My Computer' icon on the desktop.
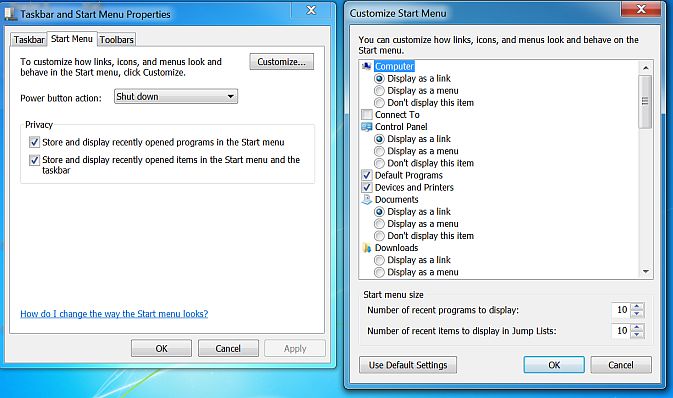
The default general behaviour of opening up Libraries in Windows Explorer is different to Windows XP. Except for My Computer, Windows XP cascaded folders and files sideways in a menu without going into Windows Explorer. It is possible to recover this behaviour in Windows 7 by customising the Start Menu as follows:
You now see a window with a long list of items. Those ticked or with a radio button set on are displayed in the Start Menu in the format identified. You can now see why the Videos Library is not displayed. Scroll down to Videos and the radio button is set for Don't display this item. Most items are set with Displayed as a link, which means Windows Explorer opens. If, instead, you change the setting to Display as a menu then the Windows XP behaviour of sideways cascading menus appears. In the long list Recent Documents has been renamed Recent Items and it is OFF by default. Notice, however, the two selectors at the bottom and, in particular, Number of recent items to display in Jump Lists. More of that later. After the Computer button on the rght pane of the Start Menu we have Control Panel; Devices and Printers; Default Programs. The first of these is identical to Windows XP in that it accesses all the tools to modify settings of your computer to you own personal preference. Devices and Settings is simply a shortcut to Control Panel - Hardware and Sound - Devices and Printers. Default Programs is another shortcut to Control Panel - Programs - Default Programs. Note that Windows XP simply listed all the control setting programs in one block whereas Windows 7 tries to 'help' by grouping them. The penultimate button on the right pane is Help and Support. This is your access to the very comprehensive help system for Windows 7. All the things that have been hidden from the user (like the Recent Document List) are mentioned there as well as giving help for the things you can see! At the foot of the right pane is the Windows 'stop' button. By default it displays the words 'shut down' with drop down options to logoff, restart, switch user, lock and sleep. The default action can be changed by Customising the Start Menu as described before and modifying the Power button action. Note that in Vista this button displayed as the normal 'off'' icon found on many TV and PVR remote controls. This confused me a little when I was traversing the web searching for Windows 7 information and finding my button was not like that displayed on the web. As stated above the left pane of the Start Menu contains buttons for starting applications. At the top of the pane you will see icons for your most recently used applications. These may vary if you use lots of applications, as only the last 10 used applications are displayed (default). It is possible to fix an application icon permanently to the list by right clicking the application and selecting Pin to Start Menu. It is also possible to remove the display of a used application by right clicking the application and selecting Remove from this List. Below the application icons comes the 'All Programs' button. This, like Windows XP, is the gateway to all your applications. However, traversing the tree of applications is significantly different. In Windows XP the menu tree structure cascaded sideways across the screen. In Windows 7 it will only use the left pane so clicking a folder will open the folder and display the folder contents in the same left pane. A back button is provided to traverse to the level above the current folder. I find this approach rather difficult to use, especially when I am not sure where an application resides. Windows 7 does not give you any option to have the Windows XP behaviour. The previously mentioned Classic Shell add-on provides a button with the Windows XP behaviour. Sometimes you need to run applications with Administrator privileges. We saw this last time when we wanted to save files in the c:\ folder. By right clicking an application you can choose Run as administrator to give you enhanced privileges while running the application.
One of the buttons on the Windows XP Start button was My Recent Documents. This gave you access to the last 15 recently used documents, which was quite handy to fire up something you were currently working on. Windows 7 does not have this feature by default but incorporates it within the 'jump list' feature. You will notice when some application icons appear on the Orb, e.g. Wordpad, there will be a little black right pointing arrow. This indicates an associated jump list. When you click on the arrow a jump list appears to the right of the application icon upon which you will find the recently used documents for that application. Click on a document and the application will fire up with that document loaded. Again there are options to 'pin' a document to the jump list so it will never disappear, even if it is used infrequently. This is really useful if you work in an application centric way. Windows XP and the document list was more suited to document centric users. Although I am a task centric person, I find this function useful and, for me, consider it one of the improvements of Windows 7. The implementation of recent documents on the jump list is a little quirky. There are reports on the web that when you save a document from within an application it does not appear automatically on the jump list. The solution is to fire up the document from within Windows Explorer and then it DOES appear. Since most users do not start documents that way it seems a little odd. More seriously, the 'recent documents on jump list' facility is implemented in such a way that it relies on the applications being modified to support it. This is a classic Microsoft trick of making their applications look better than their rivals. If you have an application that has not been updated to support it then you get somewhat disappointed when there is no jump list to access. I have the last version of OpenOfficeOrg that was in the hands of Sun, (before Sun was bought by Oracle), on my PC. The Writer application supports jump lists but the Calc application does not. Irritating. It may be that you want to customise the Start Menu, (see above), to show a Recent Item list to overcome this problem. I have now covered how most of the entries on the Windows XP Start button are covered in Windows 7. What remains are the Search and Run entries. The Run entry has, by default, been removed in Windows 7. You are supposed to use the Search facility instead. Type the name of the program to run in the search box and highlight the found entry and press enter. This is probably OK for the average user, although they better type the name right or it is not going to be found. Another problem is that the Search facility does not search everywhere on the disk(s) - only where programs and data have been indexed. On my system the search index covers Internet Explorer History; Start Menu; Users and Windows Live Mail. You can add other locations. Have a look at the Help and Support for Search for how to do this. The search on Windows XP Start Menu was very much more comprehensive allowing you to add filters for your searching. The facilities in Windows 7 are there but not totally within the Start Menu and certainly are harder to find. For example, there is a Search folder but how you get to it apart from through Help and Support is beyond me at the moment. At the time of writing I can only suggest you read Help and Support for Search to get an idea of what you can do. For the technically proficient, the lack of a Run entry can be irritating. With the Run button you did not HAVE to type anything, so obviating typing errors. There was a browse button with the XP Run entry and you could locate the program to run without typing a thing. Also there was a list of recently used programs so you could select from the list if it was there. To me, making users type things, with the potential for typing errors, is a step backwards. Windows users have always criticised Linux by saying you have to use the command line. While in recent times this is not true it seems to me that having to type in a search box is not that far removed from the same situation and is not as flexible as a run facility. For example, you cannot type command line parameters into a search box and run the program with those parameters. Fortunately, a run button can be made to appear by customising the Start Menu as before and putting a tick in the box next to Run command. That is it for this time. The desktop and Orb of Windows 7, while different, are not too frightening for die-hard Windows XP users. If it really is a problem there is always Classic Shell to fall back on. Next time I will talk about the new Taskbar/Superbar. Things are a whole lot different at the bar - prepare to be confused! |
|
|
|
|
|
|
|
|
|
|